Candy Corn Crème Brûlée for Halloween
This post contains affiliate links. As an Amazon Associate I earn from qualifying purchases.
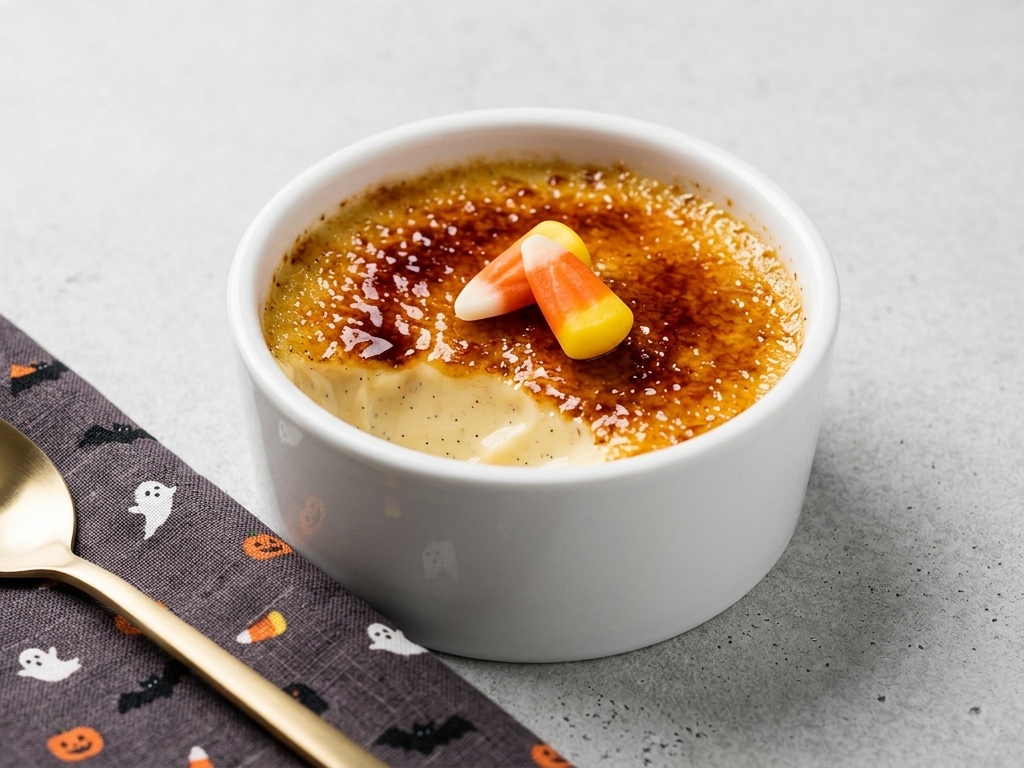
This creme brulee candy corn recipe gives the classic custard a Halloween twist by melting candy corn directly into the warm cream. The custard still has the creamy texture and crisp caramelized sugar top crème brûlée is known and loved for, while the candy adds the seasonal flavor.
There’s no need to make separate orange, yellow and white custards or try to build colored layers. Everything goes into one custard mixture, which is divided between ramekins and baked gently in a water bath. These desserts have a crisp sugar topping and a couple of candy corn pieces on top.
Candy Corn Crème Brûlée at a Glance
- Prep time: 20 minutes
- Cook time: 40 to 50 minutes
- Total time: About 5 hours 30 minutes including cooling and chilling
- Servings: 4
- Cuisine: French-inspired with an American twist
- Main ingredients: Heavy cream, candy corn, egg yolks, sugar and vanilla
- Best cooking method: Water bath followed by caramelizing the sugar topping
- Storage: Refrigerate the baked custards for up to 3 days and add the sugar topping before serving
Why You’ll Love Halloween Crème Brûlée
- The candy corn is part of the custard. It isn’t simply a regular crème brûlée with Halloween candy put on top.
- There’s only one custard to make. You don’t need separate colored mixtures or complicated layers.
- It has the classic brûléed top. A light layer of sugar is caramelized until crisp just before serving.
- You can prepare the custards ahead. Bake and refrigerate them earlier, then finish the tops when you’re ready to serve.
- A kitchen torch isn’t essential. Broiler-safe ramekins can go under a hot broiler instead.
Ingredient Notes
- Candy corn: Regular candy corn melts into the warm cream and supplies most of the sweetness in the custard. There’s no need to add orange or yellow food coloring.
- Heavy cream: Full-fat heavy cream gives the custard its rich texture. Double cream can be used in the UK, although it has a higher fat content so won’t be identical.
- Egg yolks: The yolks thicken the custard as it bakes. I recommend you separate the eggs carefully so you don’t get pieces of egg white in the mixture.
- Vanilla bean paste: I love how well the vanilla flavor goes with the sweet candy. Vanilla extract is fine if that’s what you have.
- Granulated sugar: A small amount goes into the custard and the rest is for making your caramelized topping.

How to Make Candy Corn Crème Brûlée
Start by warming the cream, candy corn and vanilla until the candy dissolves. Gradually whisk the warm cream into the egg yolks, then strain the mixture before dividing it between the ramekins. The custards bake in a hot-water bath until the edges are set and the centers still have a gentle wobble.
After cooling, refrigerate them for at least 4 hours. Add the sugar only when the custards are thoroughly chilled, then caramelize it and let the crust set fully before you add the candy corns on top.
Why Use a Water Bath?
The hot water around the ramekins provides gentler heat while the custard bakes. This helps the egg mixture cook gradually instead of setting too fast around the outside before the middle is set.
Set the ramekins in a deep baking pan first, then pour in enough hot water to come about halfway up their sides. I find it easier and safer to add the water after the pan is already positioned near the oven.
Tips for the Best Results
- Heat the cream gently and stir regularly while the candy corn melts.
- Pour the warm cream into the yolks gradually while whisking so the eggs heat slowly.
- Strain the custard before filling the ramekins to catch any small pieces of egg or candy that didn’t dissolve completely.
- Don’t overbake the custards. The edges should look set while the centers still move slightly.
- Blot away any condensation on the chilled custards before adding the topping sugar.
- Spread the sugar in a light, even layer so it caramelizes evenly.
- Add the candy corn pieces only after the caramelized topping has cooled.
What’s the Best Sugar for Crème Brûlée?
I always use regular granulated sugar because the fine crystals are easy to spread evenly across the custard. Make sure you keep the layer fairly light. Too much sugar takes longer to melt and can leave you with a thick caramel sheet that’s hard to crack with a spoon.
What Kind of Crème Brûlée Bowl Should I Use?
A shallow oven-safe crème brûlée bowl gives you plenty of surface area for the caramelized sugar, though a 6-ounce (180 ml) ramekin works well too. For this recipe you’ll need 4 individual dishes that can safely go into the oven and sit in a hot-water bath.
Very deep dishes take longer for the custard to cook through. I definitely find that relatively shallow ramekins or crème brûlée dishes are easier to work with.

How to Broil Crème Brûlée without a Torch
If you don’t have a kitchen torch, make sure your ramekins are broiler-safe and chill the custards thoroughly before adding the sugar. Put them close to a very hot broiler (grill in UK) and watch continuously. If you’re doing this, remove them as soon as the sugar has melted and caramelized because it can burn quickly.
Handy Creme Brulee Equipment
- 6-ounce crème brûlée ramekins: You’ll need 4 individual oven-safe dishes of about 6 ounces (180 ml) each.
- Kitchen torch: This gives you good control when caramelizing the sugar.
- Fine-mesh sieve: Use this to strain the custard before dividing it between the ramekins.
- Heatproof measuring jug: This makes it easier to divide the custard evenly between the ramekins.
- Deep baking or roasting pan: It needs to be deep enough for the hot water to reach about halfway up the ramekins.
- Medium saucepan: Use this to warm the cream and melt the candy corn.
- Whisk: You’ll use this for the egg yolks and while gradually adding the warm cream.
How to Store
Cover the cooled custards and refrigerate them for up to 3 days. Keep the sugar topping off until shortly before serving because caramelized sugar gradually absorbs moisture and loses its crisp texture.
Serve the custards chilled and caramelize the tops before serving. Can you freeze creme brulee? I personally wouldn’t, because I find that egg-and-cream custards can lose some of their smooth texture after thawing.

Candy Corn Crème Brûlée FAQs
Yes. Warm the candy corn gently with the heavy cream and stir until it dissolves. Strain the custard before baking to catch any small pieces that remain.
The custard should look set around the outside while the center still has a slight wobble. If you check it with a food thermometer, egg dishes should reach at least 160°F (71°C).
Yes. Use broiler-safe ramekins and put the chilled, sugared custards under a very hot broiler. Watch them continuously and remove them as soon as the sugar has caramelized.
Yes. Bake and refrigerate the custards for up to 3 days. Add and caramelize the sugar shortly before serving so the top is crisp.
You can freeze the baked custard before adding the sugar topping, but I don’t really recommend this as my first choice because I find the texture is a bit grainy or watery when I thaw it. Refrigerating it for a few days gives better results than freezing.
I used 6-ounce (180 ml) oven-safe crème brûlée bowls or ramekin for this recipe. Use 4 dishes and avoid filling them right to the rim.
Candy Corn Crème Brûlée
Ingredients
- 2 cups (475 ml) heavy cream
- ¾ cup (120g) candy corn
- 5 large egg yolks
- 2 tablespoons (25g) granulated sugar
- 1 teaspoon vanilla bean paste
- 3 tablespoons (38g) granulated sugar, for caramelizing
- 8 candy corn pieces, for garnish
Equipment
- 4 6-ounce (180 ml) oven-safe ramekins or crème brûlée bowls
- Medium saucepan
- Mixing bowl
- Whisk
- Fine mesh sieve
- Heatproof measuring jug
- Deep baking or roasting pan
- Kettle
- Kitchen torch or broiler
Method
- Preheat the oven to 300°F (150°C). Put 4 6-ounce (180 ml) ramekins into a deep baking or roasting pan. Bring a kettle of water to a boil.
- Add the heavy cream, candy corn and vanilla bean paste to a medium saucepan. Warm over medium-low heat, stirring regularly, until the candy corn has dissolved and the cream is hot. Don't let it boil hard.
- Whisk the egg yolks and 2 tablespoons (25g) granulated sugar together until smooth.
- Slowly pour about ½ cup (120 ml) of the warm cream mixture into the yolks while whisking constantly. Continue adding the remaining cream gradually while whisking.
- Strain the custard through a fine-mesh sieve into a heatproof measuring jug. Skim off any foam from the surface.
- Divide the custard evenly between the 4 ramekins.
- Carefully pour hot water into the baking pan until it reaches about halfway up the outsides of the ramekins.
- Bake for 40 to 50 minutes, checking from 40 minutes. The edges should look set while the centers still have a gentle wobble.
- Carefully remove the ramekins from the water bath. Let them cool for about 30 minutes, then cover and refrigerate for at least 4 hours.
- Before serving, blot away any moisture from the surfaces. Divide the 3 tablespoons (38g) sugar between the ramekins and spread it into a light, even layer.
- Caramelize the sugar with a kitchen torch until melted and golden. If you don't have a torch, put broiler-safe ramekins under a very hot broiler and watch continuously until the sugar caramelizes.
- Let the topping cool and harden for a few minutes. Add 2 candy corn pieces to each ramekin and serve.
Notes
- Egg dishes should reach at least 160°F (71°C) in the center for food safety.
- Don’t add the candy corn garnish until after caramelizing the sugar.
- The baked custards can be refrigerated for up to 3 days before adding the sugar topping.
- Caramelize the sugar shortly before serving for the crispest crust.
- Freezing is possible, but the custard can lose some of its smooth texture after thawing.
- You can use 1 teaspoon vanilla extract instead of vanilla bean paste.
More Desserts to Try
For more about the traditional dessert, read my guide to crème brûlée. You might also like my easy French macarons or this rich gingerbread loaf cake. If you also enjoy corn on the cob, find out how to freeze corn so you can grab some whenever you need!